Many of the procedures in the Abaqus/CAE documentation involve using one or more of the three mouse buttons. The following list explains the importance of each mouse button when interacting with Abaqus/CAE:
Mouse button 1
You use mouse button 1 to select objects in the viewport, to expand pull-down menus, and to select items from menus. The instructions “click,” “select,” and “drag” in the documentation refer to mouse button 1.
Mouse button 2
Clicking mouse button 2 in the viewport signifies that you have finished the current task. For example:
Selecting entities from the model: when you create a node set, you select the nodes to include in the set. Clicking mouse button 2 indicates that your selection is complete and you are ready to create the set.
Using a tool: click mouse button 2 to indicate that you have finished with a view manipulation tool.
![]()
If your mouse has a wheel as mouse button 2, you can scroll the wheel vertically to manipulate your view of the model or plot in the viewport. Scroll downward to magnify your view of the contents of the viewport, or scroll upward to reduce your view of the contents of the viewport.
Mouse button 3
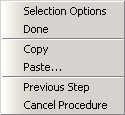
You press and hold mouse button 3 to access a popup menu that contains shortcuts to functions related to the current procedure. For example, when you press mouse button 3 in a viewport while creating a geometry set, Abaqus/CAE displays the following menu:
