Follow the instructions below to download, extract, and run the installers.
If you download the Abaqus installation media, you must extract (uncompress) the archive files into a common directory before running the installers.
Download the media archive files to any location. The files are .tar format on both Windows and Linux. If you have the standard Abaqus-only media, the file names are similar to the following:
xxx_Abaqus.1-3.tar
xxx_Abaqus.2-3.tar
xxx_Abaqus.3-3.tar
The three .tar files must be uncompressed (combining their contents) before running any of the installers.
If you have purchased the SIMULIA extended products portfolio, the media consists of five .tar files. These media contain several additional products and utilities (in addition to Abaqus): Isight, Tosca, fe-safe, and CAD associative interfaces.
Create a directory into which you will extract the archive files.
In the instructions throughout this guide, unload_dir represents the full path to this extraction directory; for example, C:\unload\ on Windows or /tmp/unload/ on Linux.
Extract each of the .tar files into the common unload_dir directory. On Windows, you can use any unzip utility; for example, the open-source 7-Zip utility, which handles the .tar format. The 7-Zip overwrite mode does not matter because there are no file or directory (folder) conflicts to merge within the combined directory structure.
You can follow the detailed steps listed below, if needed:
Windows platforms
Download all of the .tar files to a single folder.
Navigate to this folder in Windows Explorer.
Select all of the .tar files (either using the mouse to drag-select, Ctrl-A to select all, or click-select the first file and Shift-click-select the last).
With all files selected, right-click on the selection and choose 7-Zip > Extract Here.
Linux platforms
Download all of the .tar files to a single directory.
In a shell/terminal/console, change directory (cd) to the download directory and execute the command tar -xf filename on each of the files, for example:
tar -xf filename.1-3.tar
tar -xf filename.2-3.tar
tar -xf filename.3-3.tar
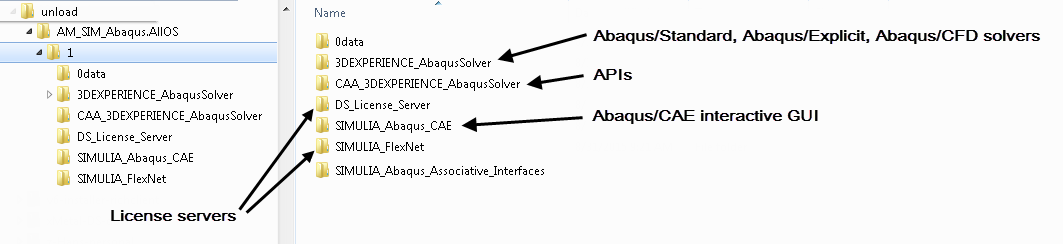
For the standard Abaqus-only media, the contents of your unload_dir directory should be as shown in Figure 2–1.
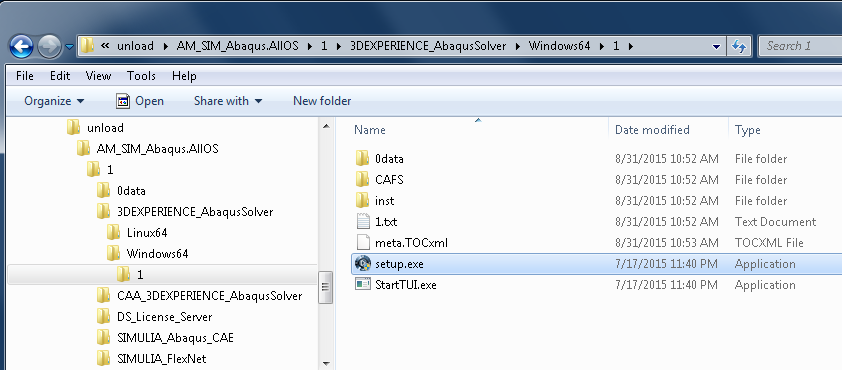
Each subdirectory under unload_dir\AM_SIM_Abaqus.AllOS\1\ contains an installer. Each installer executable installs different components. For example, to install the Windows version of the Abaqus services (solvers), you run the following setup.exe file:
unload_dir\AM_SIM_Abaqus.AllOS\1\3DEXPERIENCE_AbaqusSolver\
Windows64\1\setup.exe
unload_dir/AM_SIM_Abaqus.AllOS/1/3DEXPERIENCE_AbaqusSolver/
Linux64/1/StartGUI.sh
If you have the SIMULIA extended products media, there are several additional products and utilities delivered (in addition to Abaqus): Isight, Tosca, fe-safe, and CAD associative interfaces. The extended products media contains three product/component directories instead of one:
| unload_dir/media_name/1/ | Same contents as Abaqus-only media |
| unload_dir/media_name/2/ | Tosca and Isight |
| unload_dir/media_name/3/ | fe-safe |
Tosca must be configured with the Abaqus/CAE installation to allow the Abaqus Optimization module to work correctly; the Tosca installer handles this setting. Tosca must be installed after Abaqus/CAE.
The download media for the documentation are split into two .tar archive files. As with the software media, you must extract these .tar files into a common, merged directory before starting the documentation installer.
The Abaqus/CAE installer creates two commands to run Abaqus from the command line: abaqus and abq2016. The Windows batch files or Linux links are created in a directory named Commands. On both Windows and Linux, the installer prompts you to choose the location for this directory.
On Windows, the default location is under the folder indicated by the environment variable SystemDrive:
%SystemDrive%\SIMULIA\Commands\The standard default location of this folder is:
C:\SIMULIA\Commands\
For a list of all Abaqus command-line options, use the help command-line option with either the abaqus or abq2016 command. For a detailed description of Abaqus command-line options, see Chapter 3, “Job Execution,” of the Abaqus Analysis User's Guide.
On Windows platforms the Commands directory path is added automatically to each user's PATH environment variable during installation. On Linux platforms the Commands directory should be prepended to each user's path manually.
For hot fix (maintenance) releases, the release-specific command has the hot fix number appended. For hot fix 3, for example, the command should be named abq2016hf3.
Online documentation for all Abaqus releases, including general and extended functionality releases, is provided in two formats: HTML and PDF. There are several options for installing the documentation and making it available to your Abaqus users:
Install HTML and PDF on a server on your network, and use web server software to serve both formats to users (this is the most common choice).
Install multiple copies of the PDF files on individual users' machines, where they can view it locally using a PDF viewer such as Adobe Acrobat Reader.
Skip the documentation installer, and simply copy the PDF files from the DVD to any computers or disks.
You must have write permission in the directory where documentation is installed. Administrator privileges are required to run the installer on Windows platforms.
The commands and options used to install documentation are described below. For more details about the documentation installation options, see “Abaqus documentation installation details,” Section 2.2.
To install Abaqus documentation:
Download the documentation media .tar files to any location. Extract the two .tar files into a common directory, combining their contents, similar to the software product .tar files.
From the extraction directory, run the following executable file to start the documentation installer:
Linux platforms
extract_dir/AM_DOC_SIM_EstPrd.AllOS/1/
DOC_SIMULIA_Abaqus_fe-safe/1/Abaqus_2016/setup
[-replay full_path_to_replay_file]
Windows platforms
extract_dir\AM_DOC_SIM_EstPrd.AllOS\1\
DOC_SIMULIA_Abaqus_fe-safe\1\Abaqus_2016\setup.exe
[-replay full_path_to_replay_file]
Command option
-replay full_path_to_replay_file
Use this option to perform additional identical documentation installations without having to reenter the same information for each installation. For more information, see “Repeating documentation installations on multiple computers,” Section 2.2.2.
Follow the instructions in the dialog boxes that appear to complete the installation. Choose which formats of documentation to install:
HTML and PDF
PDF only
If you installed the HTML and PDF format and selected the “Abaqus web server” or “no web server” option, you are provided with a URL that points to your HTML documentation when the installer completes. This URL is also written to a log file in the following location:
doc_install_dir/Documentation/installation_info/v2016/info.logIf you selected the “existing non-Abaqus web server” option, a sample URL is written to the info.log file. To access the HTML documentation from the Abaqus products, you must provide a valid URL during each subsequent Abaqus product installation.
If you installed only the PDF documentation, the path to the index.pdf file is shown.
To copy the PDF documentation (without running the installer):
Find the following directory:
extract_dir/AM_DOC_SIM_EstPrd.AllOS/1/
DOC_SIMULIA_Abaqus_fe-safe/1/Abaqus_2016/pdf_docs/
Copy the entire contents of this directory.
To view the documentation, open the file index.pdf in a PDF viewer or web browser.
You may copy the PDF documentation in accordance with the following terms:
Use of this material is governed by your Abaqus software license agreement.
Keep the documentation confidential and utilize your best efforts to prevent unauthorized disclosure or use of any Abaqus Program including the Abaqus documentation for such program.
Treat all Abaqus Programs including the Abaqus documentation with the same degree of care that you treat like information of your own that you do not want publicly disclosed or the subject of unauthorized access or use.
Do not make or permit to be made any more copies of any Abaqus Program including the Abaqus documentation than are authorized by your Abaqus software license agreement.
You can use either FLEXnet or Dassault Systèmes licensing with Abaqus, Tosca, Isight, and fe-safe, depending on which type of license file you have. You can choose which type of license server to install. For Dassault Systèmes licensing, you must install the Dassault Systèmes license server (DSLS) software on any computer with a supported platform (operating system).
A new license file allows you to run all maintenance deliveries of the current version as well as the next two major releases. You must request a new license file for DSLS in order to run Abaqus 2016 from the command line.
The DSLS software package includes the Dassault Systèmes License Server Installation and Configuration Guide (DSLS.pdf), which contains instructions for configuring the license server and administering licenses. Refer to this guide for all DSLS licensing operations. You can find the DSLS.pdf file in the following location:
unload_dir/AM_SIM_Abaqus.AllOS/1/DS_License_Server/1/DSLS.pdf
To install the Dassault Systèmes license server, you must be an Administrator on Windows or root on Linux. The Dassault Systèmes license server is supported only with Abaqus 6.12 and higher.
Virtual machines, such as VMware, are not supported. It is not possible to install or run the Dassault Systèmes license server on a virtual machine.
The Dassault Systèmes license server should be installed on only one computer unless you are using a redundant license server configuration. The server computers that you choose for documentation and licensing should be accessible by all computers on the network where you plan to run Abaqus and should be stable machines that are not frequently rebooted or shut down.
Automatic configuration is recommended for most users, particularly those whose primary responsibility is not computer system or network administration. You can allow the installer to install, configure, and start the Dassault Systèmes license server automatically.
After installation, you can use the dslsstat utility to check the DSLS status; see “Using the dslsstat utility for a Dassault Systèmes license server,” Section 3.9.
If you are using an older version of the DSLS server software on Windows (3DEXPERIENCE R2015x or lower), it is recommended that you upgrade to DSLS R2016x with this Abaqus release.
To start the DSLS installer on Linux or Unix, follow these steps:
Set the DISPLAY environment variable for your computer.
Change directory (cd) into one of the following OS/platform-specific directories:
/unload_dir/AM_SIM_Abaqus.AllOS/1/DS_License_Server/1/AIX/
/unload_dir/AM_SIM_Abaqus.AllOS/1/DS_License_Server/1/SUN/
/unload_dir/AM_SIM_Abaqus.AllOS/1/DS_License_Server/1/RedHat_Suse/
Execute the file startInstLicServ.
Follow the instructions in the dialog boxes that appear to complete the installation.
After the installation finishes, you must use the Dassault Systèmes License Administration Tool to enroll the Abaqus licenses on the Dassault Systèmes license server; see “Enrolling Product Licenses” in the Dassault Systèmes License Server Installation and Configuration Guide. You must enroll the licenses before continuing with the Abaqus product installation.
To start the DSLS installer on Windows, double-click or execute the following file:
unload_dir\AM_SIM_Abaqus.AllOS\1\DS_License_Server\1\SetupDSLSmsi.exeFollow the instructions in the dialog boxes that appear to complete the installation.
After the installation finishes, you must use the Dassault Systèmes License Administration Tool to enroll the Abaqus licenses on the Dassault Systèmes license server; see “Enrolling Product Licenses” in the Dassault Systèmes License Server Installation and Configuration Guide. You must enroll the licenses before continuing with the Abaqus product installation.
You must have an Abaqus 2016 FLEXnet license file to set up a SIMULIA FLEXnet license server. FLEXnet Abaqus 2016 licensing uses FLEXnet Licensing Version 11.6.1. A license file allows you to run subsequent Abaqus 2016 maintenance deliveries, previous releases dating back to Abaqus 6.2-7, and two future major releases. For example, a new license file for Abaqus 2016 can be used to run all Abaqus 2016 maintenance deliveries and any earlier releases of Abaqus still installed on your network.
FLEXnet Abaqus licensing should be installed on only one computer unless you are using a redundant license server configuration. The server computers that you choose for documentation and licensing should be accessible by all computers on the network where you plan to run Abaqus and should be stable machines that are not frequently rebooted or shut down.
Before installing the Abaqus products, you must have a FLEXnet network license server that is compatible with Abaqus 2016 installed and running on your network.
Select the licensing installation you want to perform from the following scenarios:
Automatic configuration is recommended for most users, particularly those whose primary responsibility is not computer system or network administration. Allow the installer to install, configure, and start the FLEXnet license server for you automatically. An existing license server using a version of FLEXnet Licensing prior to Version 11.6.1 is upgraded automatically during the installation procedure if it was previously installed and configured using the Abaqus licensing installation procedure. For redundant license servers the installation will install and configure the Abaqus license servers automatically, but you will have to manually start each server. Use this method for ease of maintenance so that future upgrades can be configured automatically.
Manual configuration is required for combining FLEXnet license files with other vendors. You will need to configure and start the FLEXnet license server manually. Use this method to allow the system administrator more control.
Abaqus 2016 requires lmgrd Version 11.6.1 or higher. If you integrate your Abaqus license features with other products using a FLEXnet Licensing combined license file, ensure that your version of lmgrd meets this requirement. For more information, refer to the FLEXnet Licensing End User Guide Version 11.6, which is available from the Licensing section of the Support page at www.3ds.com/simulia.
To install Abaqus FLEXnet licensing:
On Windows, double-click or execute the following file:
unload_dir\AM_SIM_Abaqus.AllOS\1\SIMULIA_Flexnet\Windows64\
1\setup.exe
On Linux, execute the following file:
unload_dir/AM_SIM_Abaqus.AllOS/1/SIMULIA_Flexnet/Linux64/
1/StartGUI.sh
If you have an existing SIMULIA FLEXnet license server on this system, the installer attempts to stop the license server; if it is unable to do so, it provides the option to install only the licensing administration tools. If you install only the FLEXnet licensing administration tools, you must manually configure the license server. If the installer is unable to stop the existing license server and you want to complete a full automatic license server installation, you need to stop the existing server using the procedure described below.
Follow the instructions in the dialog boxes that appear to complete the installation.
On Linux platforms, the SIMULIA FLEXnet license server does not restart automatically after a system reboot by default. If you are installing a new FLEXnet license server, you must add the Abaqus licensing command to your system startup script if you want to have theFLEXnet license server restart automatically. On Windows platforms, an automatically configured license server starts automatically upon reboot.
Log files are written to the following directory when the installation is complete:
flex_install_dir/InstallData/log/CODE/os/media_name/The log files are helpful for troubleshooting problems, and they should not be removed.
Stopping and removing an existing FLEXnet license server
If you have an existing FLEXnet license server from a previous release of Abaqus running on your system, you will need to remove it before installing the new license server. The licensing installer will attempt to remove the existing server automatically. If it is unable to do so, you should remove the existing server using one of the following procedures:
Linux platforms
Enter the command
flex_install_dir/os/code/bin/lmdown -c [port]@license_server_host -vendor ABAQUSLMwhere:
os is either win_b64 or linux_a64
license_server_host is the hostname of the FLEXnet license server. If the license server is using a port that is not between 27000 and 27009, you must specify the port number as well.
Verify that the server has been stopped by running the command
flex_install_dir/os/code/bin/lmstat -c [port]@license_server_hostVerify that no ABAQUSLM vendor daemons are reported. An error status message may appear if the SIMULIA FLEXnet license server was successfully stopped and there are no other vendor daemons running on the specified host.
Windows platforms
In addition to terminating the FLEXnet license server, you must remove licensing as a Windows service.
From the Start menu, select FLEXNet Licensing Utilities to display the LMTOOLS dialog box.
Verify Configuration using Services is enabled on the Service/License File tabbed page.
Select the Start/Stop/Reread tab, select the SIMULIA FLEXnet license server and click Stop Server.
Select the Config Services tab, select the SIMULIA FLEXnet license server, and click Remove Service.
Select File![]() Exit to close the LMTOOLS dialog box.
Exit to close the LMTOOLS dialog box.
To install the Abaqus products, you must have a network license server that is compatible with Abaqus 2016 installed and running on your network. It is also recommended that you perform the documentation installation before installing Abaqus products to obtain the URL for the HTML documentation (or the base installation directory for PDF files) and to enable access to the documentation from Abaqus. You will be asked to provide the following information relating to the documentation and licensing installations:
The hostname of your license server(s) (REQUIRED).
One of the following (depending on which formats of documentation were installed):
The URL for the Abaqus HTML documentation (optional, but recommended). If you did not install the Abaqus HTML documentation before the products or if you do not specify the URL, you must perform additional steps to enable access to the HTML documentation from the Abaqus products (see “Setting the documentation URL after installation,” Section B.2).
The path to the base installation directory under which the PDF documentation files are installed (if only the PDF was installed or if you prefer PDF over HTML). Entering this path when the installer prompts you will configure the abaqus doc command to open PDF rather than HTML documentation. See “Abaqus documentation,” Section 3.2.12 of the Abaqus Analysis User's Guide, for more information.
A complete Abaqus installation includes several components:
Abaqus services (Abaqus/Standard solver, Abaqus/Explicit solver, Abaqus/CFD solver, SIMULIA Co-Simulation Engine, and APIs foundation)
CAA developer software for Abaqus APIs
Abaqus/CAE (interactive GUI) and command-line interface to Abaqus solvers
It is strongly recommended that all components be installed.
The commands used to install the Abaqus components are described below. For a more complete discussion of the Abaqus product installation options, see “Abaqus product installation details,” Section 2.4.
To install the Abaqus services (solvers):
Execute one of the following commands:
Linux platforms
unload_dir/AM_SIM_Abaqus.AllOS/1/3DEXPERIENCE_AbaqusSolver/
Linux64/1/StartGUI.sh
where unload_dir is the directory in which you extracted (uncompressed) the media archive files.
Windows platforms
unload_dir\AM_SIM_Abaqus.AllOS\1\3DEXPERIENCE_AbaqusSolver\
Windows64\1\setup.exe
where unload_dir is the directory in which you extracted (uncompressed) the media archive files.
Choose an empty directory/folder in which to install the software. This directory must be completely empty with no files or subdirectories.
Choose the components to install:
Abaqus/Explicit Solver
Abaqus/CFD (Flow) Solver
Abaqus/Standard Solver
Cosimulation Services
ODB API Services
It is strongly recommended that all components be installed.
Follow the instructions in the dialog boxes that appear to complete the installation.
To install the Abaqus CAA APIs:
Execute one of the following commands:
Linux platforms
unload_dir/AM_SIM_Abaqus.AllOS/1/CAA_3DEXPERIENCE_AbaqusSolver/
Linux64/1/StartGUI.sh
Windows platforms
unload_dir\AM_SIM_Abaqus.AllOS\1\CAA_3DEXPERIENCE_AbaqusSolver\
Windows64\1\setup.exe
When you are prompted for the directory to install into, enter the directory in which you installed the Abaqus services (solvers). You can only install CAA APIs for the software products you have already installed.
Follow the instructions in the dialog boxes that appear to complete the installation.
To install Abaqus/CAE:
Important: Abaqus/CAE must be installed to complete the Abaqus solvers installation.
Execute one of the following commands:
Linux platforms
unload_dir/AM_SIM_Abaqus.AllOS/1/SIMULIA_Abaqus_CAE/
Linux64/1/StartGUI.sh
Windows platforms
unload_dir\AM_SIM_Abaqus.AllOS\1\SIMULIA_Abaqus_CAE\
Windows64\1\setup.exe
Choose an empty directory/folder in which to install the software. This directory must be completely empty with no files or subdirectories.
Follow the instructions in the dialog boxes that appear to complete the installation.
You will need to enter the path to the location where you installed the Abaqus services (solvers). This allows the two components to connect with one another.
Log files are written to the following directory when each installer finishes:
install_dir/InstallData/log/CODE/os/media_name/The log files are helpful for troubleshooting problems, and they should not be removed.